 |
| HOME | PAPERARTS | ARTWORK | CRAFTS | RESOURCES |
| E-MAIL ME | WRITING | PHOTOS | JEWELRY | LINKS |
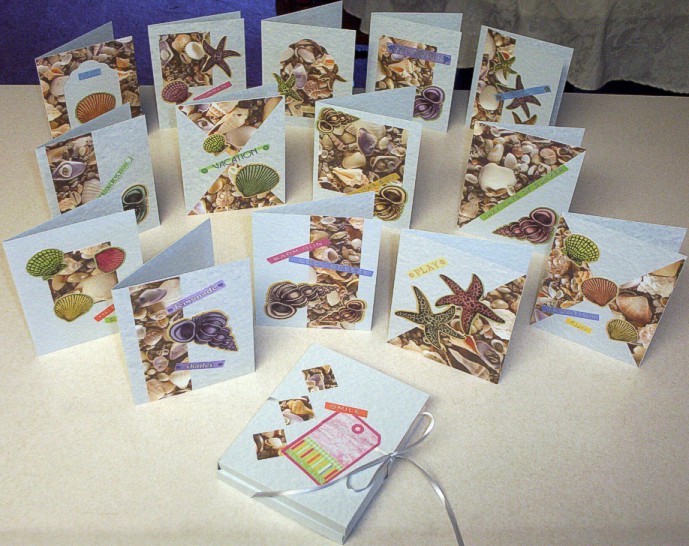
Make a Gift Set of 14 Cards and Folder
|
This notecard gift set requires 8 sheets of identical 12 x 12 scrapbook paper, 8 pieces of coordinating 8.5 x 11 cardstock, a package or two of stickers, and a bit of ribbon. You will make 14 cards, 14 envelopes, and a portfolio to contain them. |
 |
The Cards
| This image is to scale but NOT full sized. It is provided for assistance in guiding your measurements. 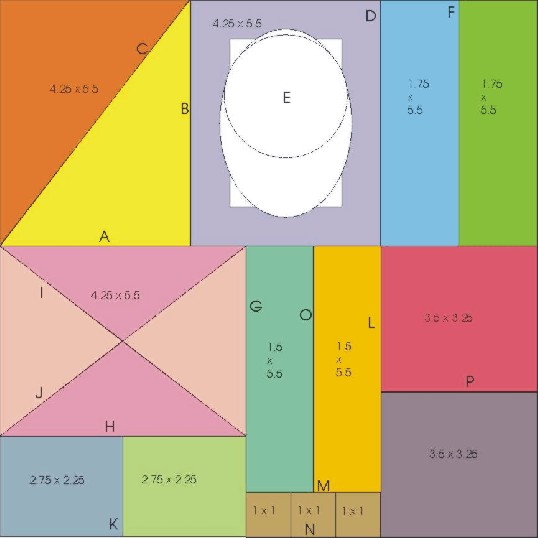
|
|
A. Measure 5.5 inches from the top edge and cut across the whole page. B. Working from this piece you have removed, measure 4.25 inches from C. Cut the resulting 5.5 x 4.25 inch piece in half diagonally. D. Working from the piece you removed this from, measure 4.25 inches E. Select a rectangle, oval or circle and cut from the center of this 5.5 x 4.25 inch piece. Set both aside for cards 3 and 4. F. From the left over piece cut two strips 1.75 x 5.5 inches. G. From the left edge of the original page, measure and cut off H. From the top of this piece measure and cut at 4.25 inches. I. Cut the resulting 5.5 x 4.25 rectangle on the diagonal J. Cut the other diagonal creating 4 triangles. Set the two ends aside K. Take the 2.5 x 5.5 rectangle left over from step H and cut in half L. From the original large piece measure and cut 3 inches M. From the bottom of this piece, measure and cut a 1 x 3 inch strip. N. Cut this into three 1 x 1 inch squares. Set these aside for O. Cut the left over rectangle from step M in half lengthwise creating P. Cut the final remaining piece into two rectangles measuring Cut 7 pieces of 8.5 x 11 inch cardstock in half creating 14 pieces Fold each card in half and crease with a bone folder. Decorate each card front with the assigned pieces of the scrapbook Embellish with stickers, ribbons, charms, etc. as desired. |
The Envelopes
| This image is to scale but NOT full sized. It is provided for assistance in guiding your measurements. 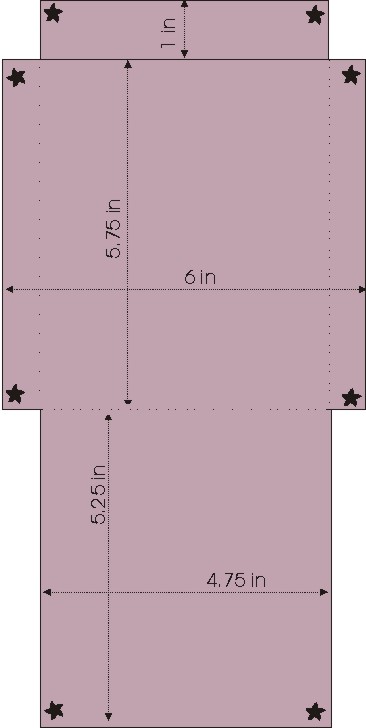
|
|
Make a template on a 12 x 6 inch piece of card using the Lay out and trace two envelopes on each of 7 pieces of 12 x 12 Cut out envelopes. Round corners slightly at each star. Fold in sides, fold up center, fold over end flap. Tuck side flaps in and glue center to side flaps. If you are using this as a gift pack you may wish to apply envelope |
The Folder
| This image is to scale but NOT full sized. It is provided for assistance in guiding your measurements. 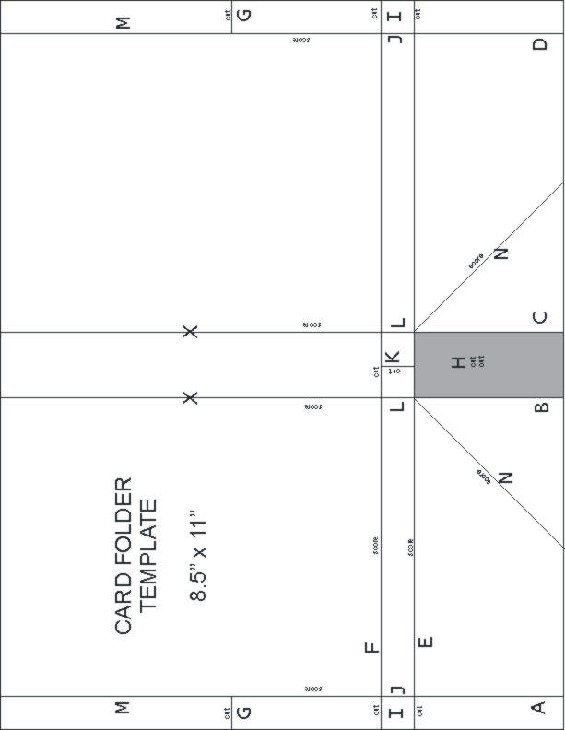
|
|
Use a single piece of 8.5 x 11 inch cardstock that matches your cards. Lay card in landscape for all instructions. A-measure and score ˝ inch from left edge B-measure and score 5 inches from left edge C-measure and score 5 inches from right edge D-measure and score ˝ inch from right edge E-measure and score 2 Ľ inches from bottom edge F-measure and score 2 ľ inches from bottom edge G-measure and cut only the two side borders 3 ˝ inches from the top edge H-Cut out and discard shaded area using the scored lines as a guide. I- measure and cut only the two side borders 2 Ľ and 2 ľ inches J-Fold forward both ˝ x ˝ inch flaps and glue down K-Make cut across spine along fold and down center of small section L-Fold forward both ˝ x ˝ flaps and glue M-Fold forward both upper side flaps and glue N-Measure and score from the top left of the removed piece to the Fold inward on all remaining scored lines. Glue overlapping lower side flaps on left edge to one another to At the X on each side of the spine cut a slit along the fold the Feed each end of the ribbon through one slit, from inside to outside. Center on spine and lightly glue in place. On outside of each cover add a small dab of glue to secure ribbon Use the three pieces of scrapbook paper designated in step N above Add stickers, charms, ribbons matching the cards to finish the ensemble Inside each pocket of the folder, place 7 cards and 7 envelopes. Close and tie ribbon at right side. NOTE: White glue or PVA works best for this project. Glue stick, double- |
| TOP |
http://mystudio3d.com